Access Your Raspberry Pi From Anywhere: A Guide
Can you truly harness the power of your Raspberry Pi from anywhere in the world? The answer is a resounding yes, and it's more achievable than you might think. This opens up a world of possibilities, from remotely managing your home server to accessing your projects on the go.
The journey begins with understanding a fundamental concept: port forwarding. In essence, port forwarding acts as a gateway, allowing external traffic to reach specific devices within your local network. Its like setting up a postal service for your Raspberry Pi, directing letters (data) to the correct address (IP address and port) within your home. Without it, your Pi remains hidden behind the protective shield of your router, inaccessible from the outside world.
To comprehend port forwarding, imagine your home network as a city. Your router is the city's gatekeeper, and your Raspberry Pi is a specific building within that city. When someone from outside the city (the internet) wants to visit a specific building, they must first go through the gatekeeper (the router). The gatekeeper needs to know the exact address of the building (the internal IP address of your Raspberry Pi) and the specific entry point (the port) to allow the visitor to enter. Without port forwarding, the gatekeeper doesn't know where to send the visitor, and your Raspberry Pi remains unreachable.
Setting up port forwarding isn't overly complex, but it requires a few key steps. First, you'll need to access your router's admin panel. This typically involves entering the router's IP address into a web browser. Once logged in, you'll need to find the "port forwarding" section, which may be labeled differently depending on your router's brand and model. Within this section, you'll create a new rule, specifying an external port (the port you'll use to access your Pi from the outside world, such as 2222) and directing it to the internal IP address of your Raspberry Pi (e.g., 192.168.1.100) on port 22 (the standard port for SSH, which allows secure remote access). Remember that the default password for a Raspberry Pi is 'raspberry', but you should change this immediately for security reasons. Consider this the first line of defense in securing your Pi.
However, setting up port forwarding can be tricky. If you want to connect to the Pi via Putty from outside your local area network (LAN), you will need to connect to your router's outside IP address, not the Pi's IP address. You can typically find this by navigating to your router's settings page and looking under "router status". Remember to keep connecting to port 22 in Putty for SSH access.
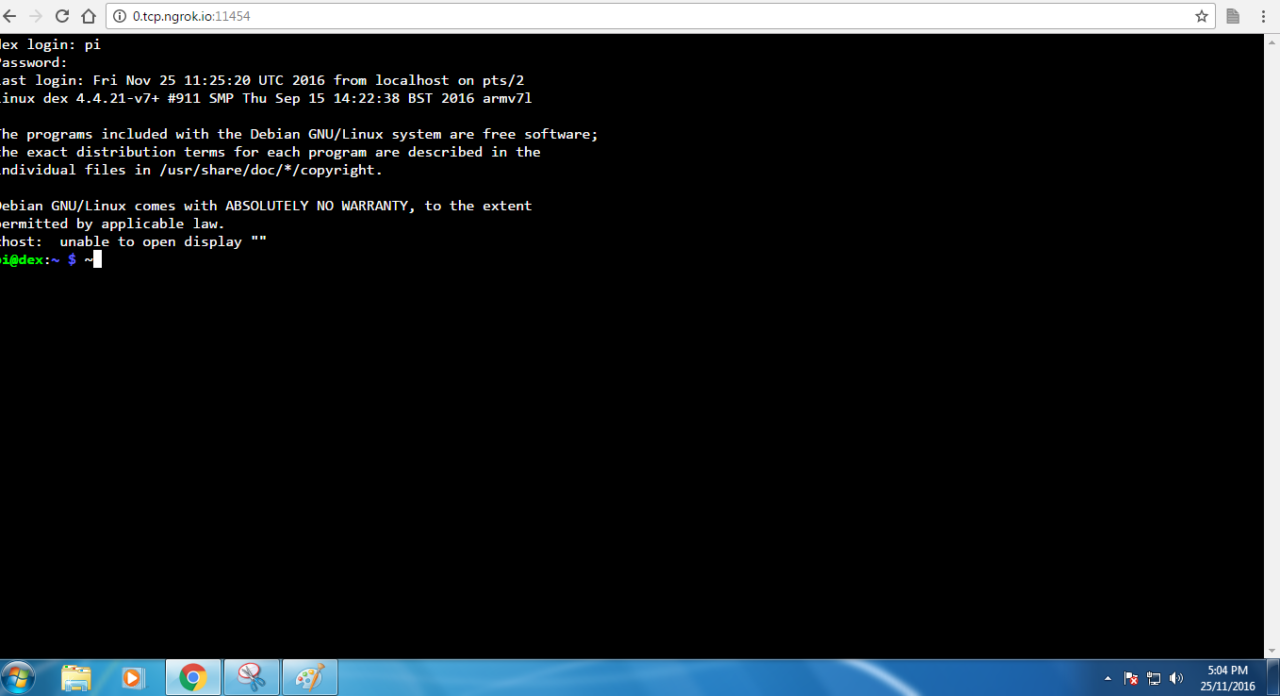
Beyond port forwarding, there are alternative methods. One such method involves using services like ngrok, which simplifies the process by creating a secure tunnel to your Raspberry Pi. Ngrok requires minimal setup, typically just a few commands in the terminal. This approach offers a more streamlined experience, especially for those less comfortable with router configuration. Services like SocketXP also offer a secure public tunnel endpoint, enabling you to SSH into your Raspberry Pi from anywhere. SocketXP simplifies the setup and provides a more secure approach.
If you find you can't access your Pi from outside your network, consider the potential pitfalls. A firewall on your Raspberry Pi, or another service blocking connections from certain IP addresses, could be the culprit. Additionally, check if your router is directly connected to an external internet interface. If you're using another modem or device, you might need to configure port forwarding on that device as well.
If you're on the same local network as your Pi (e.g., both have 192.168.x.x addresses), you can use the ping command to check if your Pi is running and reachable. For instance, "$ ping 192.168.86.50" will help you determine this. If you are outside your local network, you will not be able to ping the Pi at home directly, but you should be able to ping your home's public IP address. This will allow you to get connected to your pi from anywhere.
Once you have the access you need, you can begin using your Pi for a range of different purposes. This includes managing IoT projects, hosting a personal server, experimenting with home automation, or even setting up a NAS (Network Attached Storage) server. With a Raspberry Pi, the possibilities are really endless.
One particularly interesting application is setting up a NAS server. This involves using a Raspberry Pi (ideally a 3B+ or 4) and an external hard drive (preferably an SSD). You can then access your files from outside the network, allowing you to access your digital media. This is particularly useful for those who are working on multiple platforms, such as PC, Mac and Android.
Remote access to your Raspberry Pi's full operating system can be achieved using VNC Connect. VNC (Virtual Network Computing) has long been a trusted method for accessing any computer remotely on the same network. The remote access provided by VNC can be a simple method to control your Raspberry Pi from your PC, tablet or other device. While it's important to note that your data passes through a proxy computer, which some may see as a drawback, VNC allows you to control your Pi desktop, making it a powerful tool for remote control and management.
If you're new to this, the initial steps can seem challenging. If you've defined a static IP address (e.g., 192.168.1.100) for your Raspberry Pi, you may be able to connect via port 1399. However, if you are connected to a different network, the initial configuration may need to be tweaked. The configuration of the system, particularly when first starting out, can be quite daunting. Fortunately, with practice, it's something that can be achieved.
Another option to consider is using a cloudflare tunnel. To set this up, you will first need to install "cloudflared" on the server where the service is running, which, in this case, is your Raspberry Pi. This creates a secure way of accessing your data, using a trusted service. While the initial set up can be difficult, it provides a useful way to achieve the results you're looking for.
There are various software options for accessing your Raspberry Pi and connecting to a network. These options include but are not limited to Raspberry Pi OS, Raspberry Pi Connect, and a number of other options for different operating systems, including those for PC and Mac. You can access various applications such as Android, Debian, FreeBSD, Gentoo Linux Kernel, NetBSD, OpenSuse, Plan 9, Puppy Arch. These different options allow you to control and access your Pi from a variety of different operating systems.
Remember, to connect from outside your network, you should use your public address, not your 192.168.x.x (or other private address). If you do not know this, several online services can provide it. A quick search online will direct you to these resources, and it can also tell you what your IP address is on the search page. Once you have this, you can begin to fully make use of all the different functions your Raspberry Pi offers.
Many find it difficult to find information online regarding remote access of their Pi, especially when they are starting out. Accessing your Raspberry Pi from outside your network is something that is easier to achieve than it once was. With the right tools and configuration, you can open up your Pi to a wide range of possibilities. Remember to change your default password for security, to make sure that the Pi is secured and protected.

