Access Your Raspberry Pi Remotely: Easy Guide & Solutions
Are you finding it increasingly difficult to access your Raspberry Pi remotely, feeling stymied by network configurations and the complexities of remote access? Understanding the intricacies of connecting to your Raspberry Pi from anywhere in the world can transform your projects, opening up a universe of possibilities for home automation, coding, and more.
The challenge of accessing your Raspberry Pi from outside your local network often stems from the nature of how networks operate. When you're at a coffee shop, and your laptop attempts to connect to your Raspberry Pi at home, it doesn't directly reach the device. Instead, the request goes to your home's public IP address, which is unique, unlike the local IP address of your Raspberry Pi. Think of it like this: your home has a unique street address, but within that house, there are many rooms.
| Feature | Details | |----------------------|-------------------------------------------------------------------------------------------------------------------------------------------------------------------| | Purpose | Facilitating remote access to a Raspberry Pi device, allowing users to interact with it from outside their local network. | | Methods | SSH, VPN (Tailscale, OpenVPN), DDNS, Port Forwarding, Ngrok, SocketXP, etc. | | Key Components | Router Configuration (Port Forwarding), Dynamic DNS (DDNS), Virtual Private Network (VPN), Secure Shell (SSH), Public Tunnel Endpoints (SocketXP, Ngrok). | | Common Problems | IP Address Changes, Firewall Restrictions, Security Concerns, Complex Network Configuration, Limited Technical Knowledge. | | Solutions | Implementing DDNS to manage changing IP addresses, setting up port forwarding on your router, using VPNs for secure connections, and utilizing tunneling services. | | Benefits | Remote control of devices, home automation, secure access, and the ability to manage your Raspberry Pi projects from anywhere. | | Reference | [Raspberry Pi Official Website](https://www.raspberrypi.com/) |
Several methods provide a pathway to this remote connection. One common approach involves setting up port forwarding on your router. This is essentially telling your router to direct incoming traffic on a specific port to the IP address of your Raspberry Pi. The process begins by accessing your router's admin panel via its IP address in a web browser, locating the "port forwarding" section, and configuring it to forward traffic to your Raspberry Pi.
Another effective strategy is to use a Dynamic DNS (DDNS) service. Because home IP addresses can change, a DDNS client, installed either on your Raspberry Pi or your router, automatically updates a hostname associated with your IP address. This way, you can always access your Raspberry Pi using a consistent hostname, regardless of IP changes. Services like No-IP and DuckDNS offer such capabilities, simplifying remote access.
Virtual Private Networks (VPNs) provide a secure tunnel for your connection. Services like Tailscale and OpenVPN are popular choices. Using a VPN encrypts your data and provides an added layer of security. Setting up a VPN often involves installing the VPN client on your Raspberry Pi and configuring your router to allow VPN connections.
Tunneling services like Ngrok and SocketXP offer user-friendly alternatives. Ngrok, for example, requires minimal setup, often just a few commands in the terminal. It creates a secure public tunnel, allowing you to expose your Raspberry Pi to the internet without complex network configurations. SocketXP provides a secure public tunnel endpoint for SSH access, simplifying the process even further.
For those new to the Raspberry Pi world, understanding the basics can be overwhelming. A static IP address, assigned to your Raspberry Pi, is often the first step. This ensures your Pi always has the same address on your local network. While useful locally, a static IP alone is not enough for remote access. That's where port forwarding, DDNS, and VPNs come in.
The "I'm actually surprised the op's it dept has not taken the pi off the network" statement highlights a valid concern. Connecting personal computer equipment to corporate networks without proper authorization can pose security risks and is often against IT policies. In a corporate environment, access controls and security measures are usually stringent to protect sensitive data.
When you're working on a project, being able to access your Raspberry Pi from anywhere is invaluable. Whether you're using it for home automation, controlling a robot, or just experimenting, remote access unlocks new possibilities. The key is to choose the method that best suits your technical expertise and security needs.
Using SSH (Secure Shell) is a widely used method for secure remote access. SSH encrypts the connection between your computer and the Raspberry Pi, protecting your data. Tools like PuTTY are used to establish an SSH connection, and you'll typically use the Pi's IP address, username, and password to connect.
For those seeking a simple solution, consider services like SocketXP, which provides a secure public tunnel endpoint for SSH access. This eliminates the need for port forwarding and static IP addresses. Alternatively, Ngrok provides similar functionality, creating a secure tunnel with just a few commands in the terminal.
Mastering Python on your Raspberry Pi is essential. It allows you to create, understand, and improve scripts. Many projects rely on Python for their functionality, from controlling LEDs using an HTML interface, like when using a Raspberry Pi Pico W, to controlling home automation devices.
When setting up remote access, security should always be a top priority. A VPN, like Tailscale, is highly recommended. It encrypts all your traffic and provides an additional layer of protection. Consider the use of strong passwords, two-factor authentication, and regularly update your Raspberry Pi's software to patch any vulnerabilities.
Remember to configure your router. Access your router's admin panel and locate the "port forwarding" section. Add a rule to forward traffic on the port you want to use (typically port 22 for SSH) to the IP address of your Raspberry Pi. Every router interface is different, so refer to your router's manual.
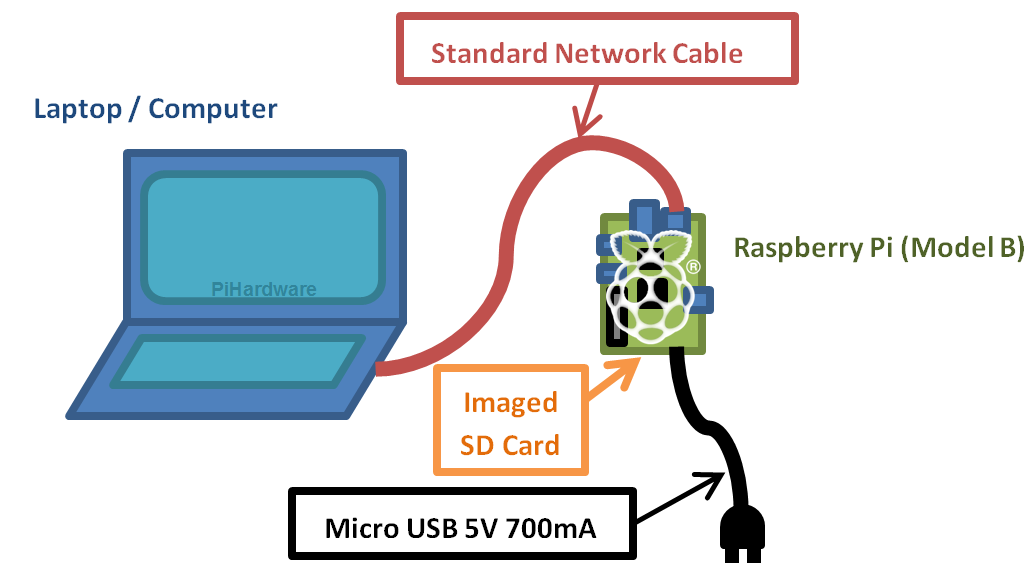
Accessing your Raspberry Pi from outside your home network involves several steps. You may need to first assign a static IP address to your Raspberry Pi. This will ensure its IP doesn't change, which makes it easier to connect. Then, set up port forwarding on your router to forward traffic to the Raspberry Pi's IP and port. Finally, configure a dynamic DNS service to link your dynamic public IP to a consistent hostname.
If you encounter problems, don't be discouraged. Search online forums and communities. Websites such as thesecmaster.com provide valuable tutorials and guides. You can also ask for help on sites such as Raspberry Pi forums and Stack Exchange, for instance. Patience and persistence are key when it comes to setting up remote access.
Whether you are connecting from your laptop in a coffee shop, or remotely controlling your home automation system, knowing how to connect to your Raspberry Pi from outside your network expands the possibilities. Start with the basics. Explore the different methods. Remember security and the best option is to use your own. Experiment, learn, and enjoy the process of remote access.
The goal is to understand your Raspberry Pi's capabilities, stop endlessly searching for help, and finally enjoy completing your projects. By combining this information with other resources, you can create and improve any python script for your Raspberry Pi.
From an iOS device, the Windows Remote Desktop app, "RD client," is a great option. This enables the user to control the Pi from anywhere. The ability to learn how to connect to your Raspberry Pi from outside your network and unlock remote access and control makes projects and learning fun.

